What Happens During Mold Remediation, Start to Finish
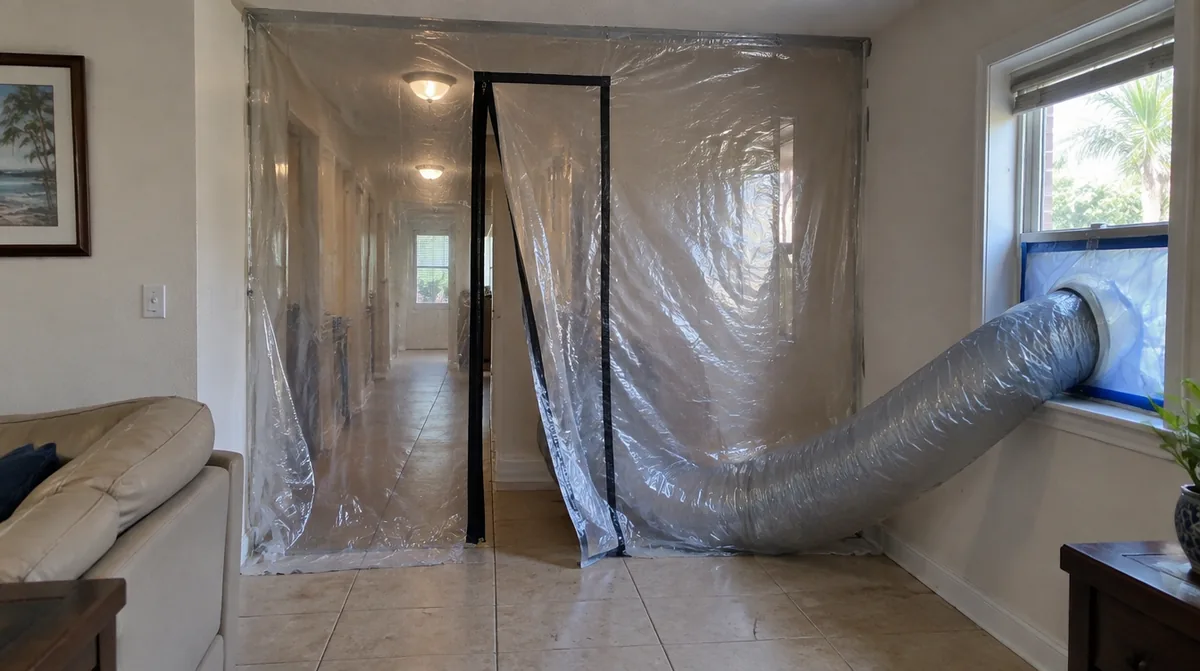
Many homeowners picture mold removal as someone spraying a wall and wiping it down. Real remediation looks very different. It is a planned job with a clear order of steps, and each step exists to stop spores from spreading while the damaged material comes out.
Knowing what happens during mold remediation helps you prepare your home, ask good questions and spot a job that skips the parts that matter.
Step One: Finding the Moisture Source
Mold is a symptom. The real problem is water, so the job starts by tracking it down. A technician looks at the visible growth, then follows the stains, smells and soft spots back toward where the water came from.
Common sources in South Florida homes include:
- A leaking supply line under a sink or behind a toilet
- An AC drain line that backs up into a closet
- Rain getting past a window frame or sliding door
- A roof leak dripping onto attic sheathing
- High indoor humidity in a room that never gets cool air
Moisture meters and a thermal camera help show how far the wet area really reaches. Growth you can see is often only part of what is there.
Step Two: Containment
Before anything gets disturbed, the work area is sealed off. Crews hang plastic sheeting from floor to ceiling, tape the seams and add a zipper door so people can get in and out.
Why negative air pressure matters
A negative air machine pulls air out of the contained space through a HEPA filter and vents it outside. Because air always flows toward lower pressure, any leak in the plastic pulls clean air in rather than letting dusty air out. HVAC vents in the room are usually covered too, so the system does not carry spores to other rooms.
Step Three: Removing Damaged Material
This is the part most people imagine. Porous materials that have mold growing into them, such as drywall, insulation and carpet pad, are cut out and bagged inside the containment. Heavy plastic bags are sealed before they leave the room.
Harder surfaces like wood framing, concrete block and metal are cleaned rather than thrown away. Workers may scrub them, sand stained wood or use a HEPA vacuum to pull loose spores off the surface.
What workers wear
Expect to see respirators, gloves, eye protection and disposable suits. That gear protects the crew and keeps them from carrying spores through the house on their clothes.
Step Four: Cleaning and Drying
Once the bad material is gone, every surface inside the containment gets HEPA vacuumed and wiped down. This removes the fine dust that settles after demolition.
Drying comes next. Dehumidifiers and air movers run until the framing and slab reach normal moisture readings. Closing up a wall while the studs are still damp is one of the most common reasons mold comes back.
Step Five: The Clearance Check
Before the plastic comes down, the space is inspected again. Surfaces should look clean, there should be no musty odour and moisture readings should be back in range. Some homeowners also choose post-remediation air or surface sampling by an independent assessor for added confidence.
Only after that check does the containment come down and rebuilding begin. New drywall, paint and flooring go in once the area has passed.
How to Prepare Your Home
A few simple steps make the job go smoother:
- Move furniture and stored items away from the affected room if you can do it without disturbing the mold.
- Keep pets and children out of the work zone.
- Turn off the AC if the technician asks, so it does not pull air from the area.
- Have the water source fixed, or plan for the repair, so the problem does not return.
If you want to know how these steps would apply to your home, our page on mold remediation services explains what the work covers and how to book an inspection. For bathroom growth around tubs and showers, the same process applies on a smaller scale.
How Long Each Stage Usually Takes
Timing depends on the size of the area and how wet the structure is. Setting up containment is often done in the first part of a visit. Removal of a single wall section may be finished in one visit, while a larger area with several rooms can take longer.
Drying is the stage people underestimate. Wet framing and concrete give up water slowly, especially in humid weather. Equipment may run for several days before readings come down. Rushing this step to get the walls closed sooner is a false saving.
Signs a Job Is Being Done Right
- The work area is sealed before any material is cut.
- You can see or hear an air machine running and venting outdoors.
- Debris leaves the room in sealed bags, not loose in a bin.
- Moisture readings are taken and shared with you.
- Nobody suggests painting over growth or simply spraying it.
If any of these are missing, ask why. A clear answer usually means the crew has thought it through. A vague one is worth a second opinion.
Living in the Home During the Work
Most families stay at home during smaller jobs, since the containment keeps the rest of the house separate. For larger projects or people with breathing problems, staying elsewhere for a few days can be more comfortable. Talk it over before work starts so the plan suits your household.